Scott Piersall's Step-by-Step Guide For High-Security SSL Configuration of IBM HTTP Server Running on z/OS
My step-by-step guide to security "hardening" your IBM HTTP Server SSL Deployment on z/OS
Overview
This guide is a follow-up to my previous guide on using a Let's Encrypt SSL Certificate on IBM Http Server on z/OS.
To help guide your efforts, I will prompt you to write a few things down as you proceed through these steps so that you have information from a step that is required for a subsequent step.
Prerequisites
What You Need
- A computer (I used a virtual machine) running Linux (I Used Ubuntu).
- RACF Permissions on z/OS to create datasets, install certificates, and modify keyrings.
- Knowledge of the USS command-line and ISPF panelsand server administration.
- Patience. I attempted this multiple times before I got it correct. I BELIEVE that I have eliminated most of the pitfalls and trap doors
- A working IBM HTTP Server Deployment on z/OS which uses a KeyFile for RACF KeyRing usage by IBM_MOD_SSL
Download your Certificate Authority's intermediate Certificate
For my Let's Encrypt Certificate, I needed the R11 certificate
I used wget to download the R11 certificate on my ubuntu-based VM via:
wget http://r11.i.lencr.org/ --output-document=ler11.derThis command, with the options specified, will download the R11 Certificate from Let's Encrypt and save it in the current directory to a file called ler11.der
Upload the Intermediate certificate to Unix System Services
I used FTP to transfer the ler11.der file to my Unix System Services home directory. You MUST using binary transfer mode!
NOTE: The der format is NOT human-readable
Create a Sequential Dataset in z/OS to Store the Intermediate Certificate
We need to create a sequential dataset to store the ler11.der certificate we downloaded and transferred to our Unix System Services home directory. We will need to provide the dataset name to RACF to import this certificate into the RACF database.
I have included the dataset parameters I used (you don't need 5 cylinders, 1 is plenty).
NOTE: You must use a RECFM=VB and a LRECL=256. If you use a different RECFM or LRECL size, RACF will not import the certificate from the dataset and give you an invalid data error.
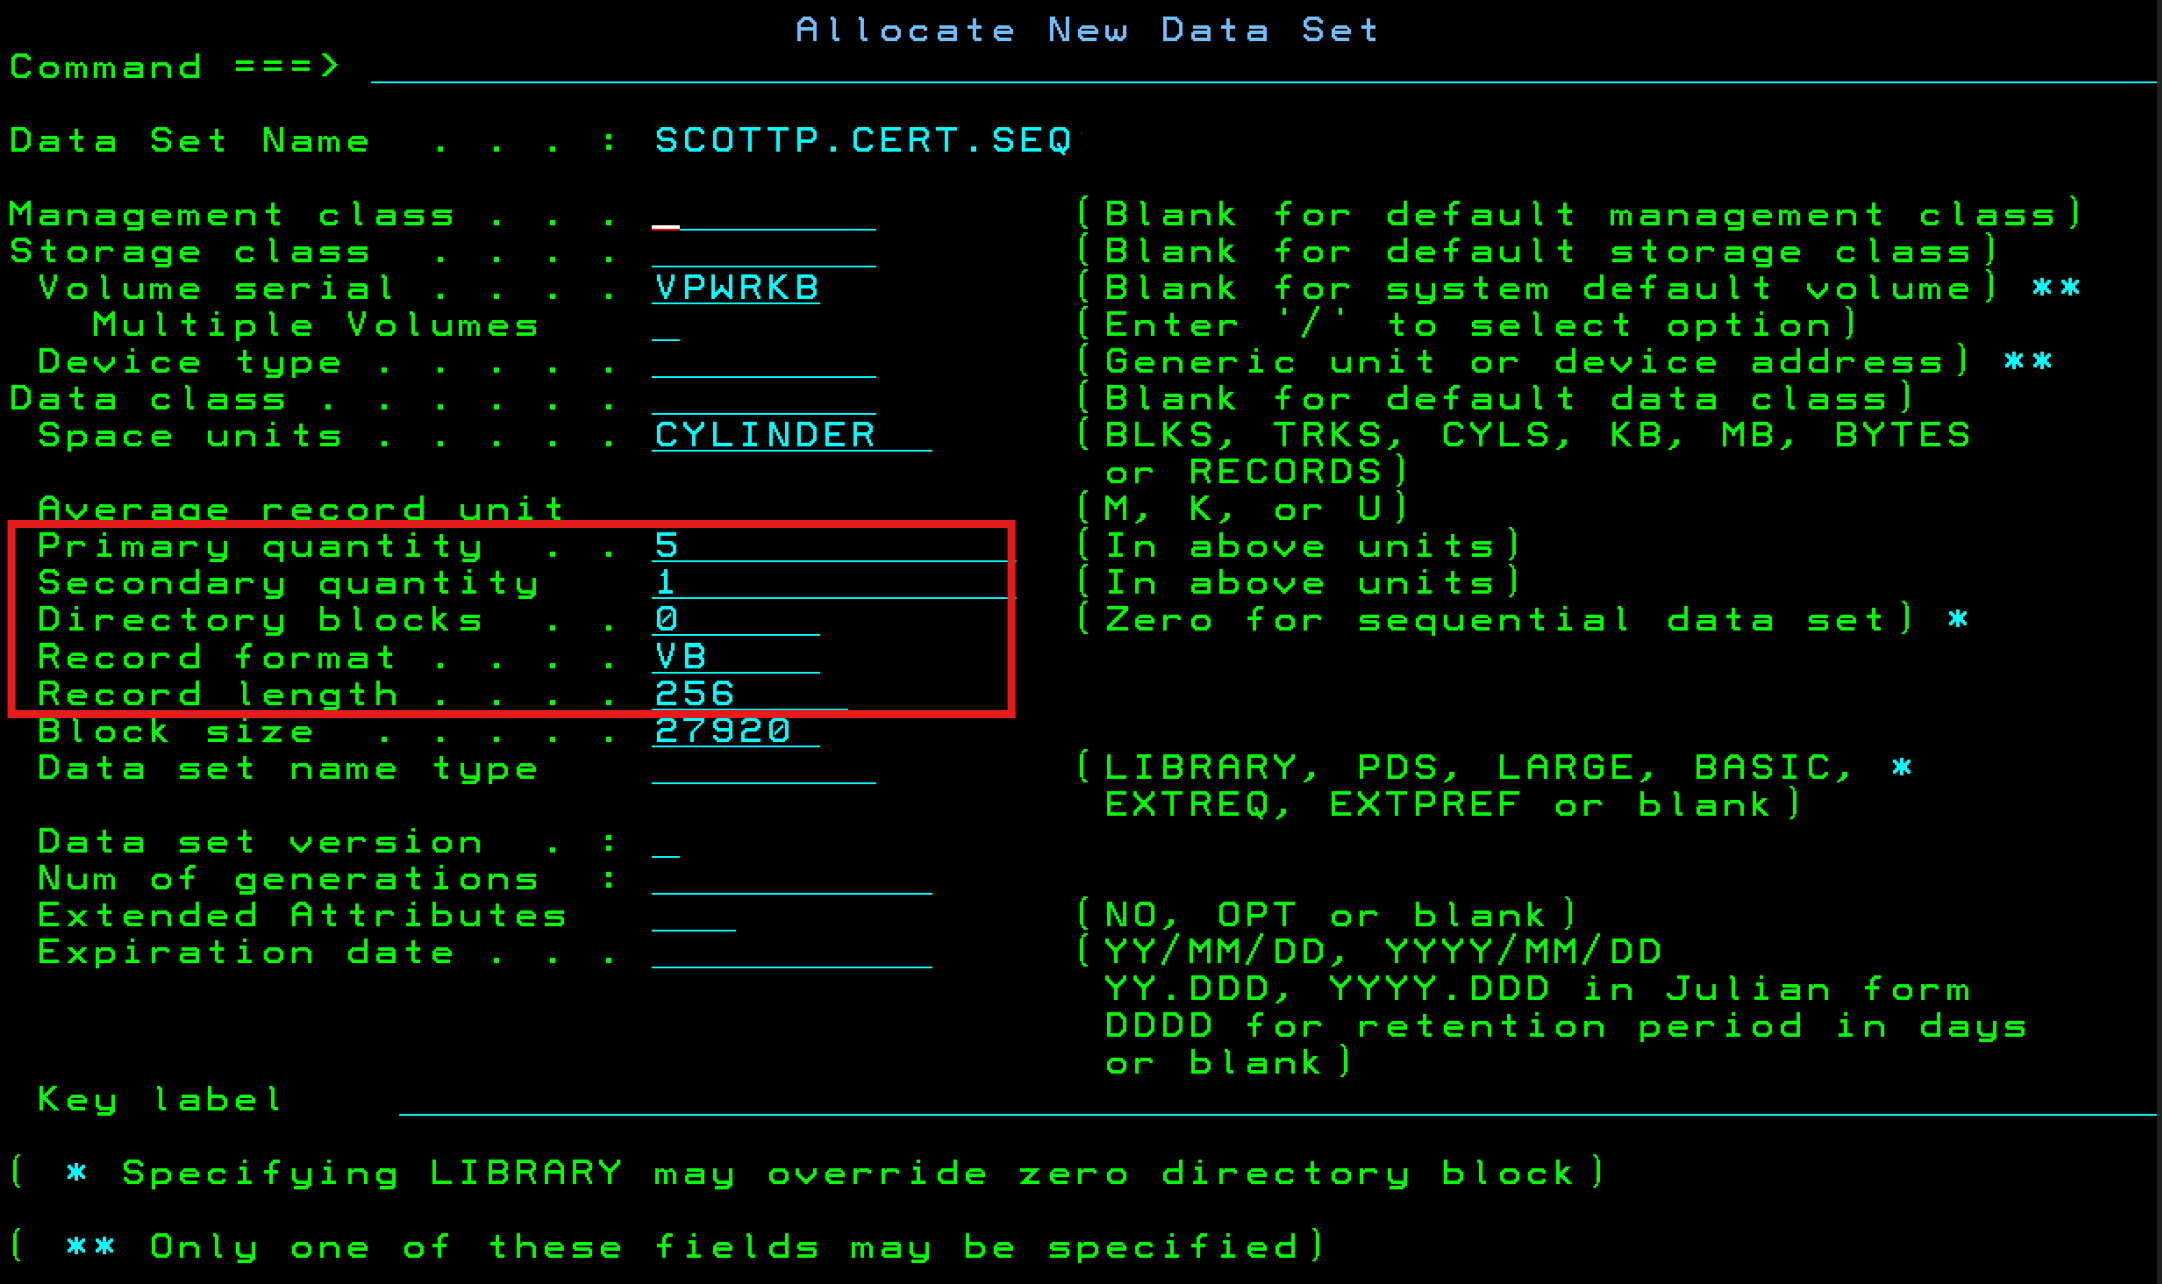
NOTE: I called my dataset SCOTTP.CERT.LER11 so that I could remember that it contains an intermediate certificate for Let's Encrypt and that the certificate is R11. You should only need 1 cylinder. If space is a concern for you, after you import the certificate into the RACF database, you can delete this dataset.
WRITE THIS DOWN:
The CA Intermiediate Certificate dataset name is: _______________________
You will need to provide RACF the dataset name when you add the certificate to RACF
Import The Intermeddiate Certificate into RACF Database
Using RACF, we need to import the certificate containned in our dataset into the RACF database. You can of course do this using TSO/commandline. I will walk you through the steps (6.1 - 6.7) using ISPF
Import The Intermediate Certificate into RACF Database
Using RACF, we need to import the certificate containned in our dataset into the RACF database. You can of course do this using TSO/commandline. I will walk you through the steps (6.1 - 6.7) using ISPF
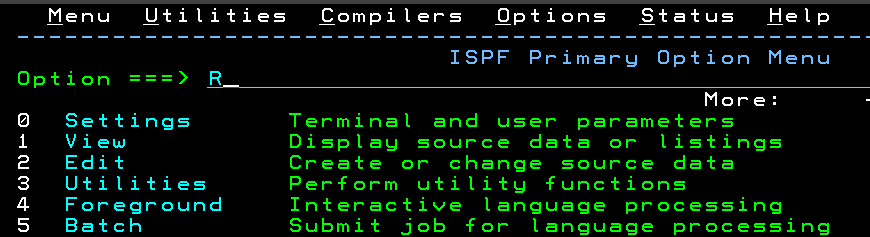
Select RACF from the ISPF Primary Option Menu
Select "R" from the ISPF Primary Option menu
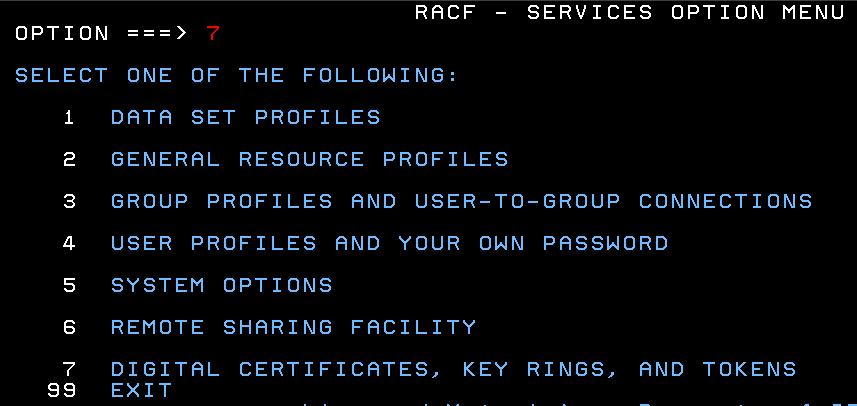
Select Digital Certificates Option in RACF
Select Option 7 from the RACF SERVICES OPTION MENU
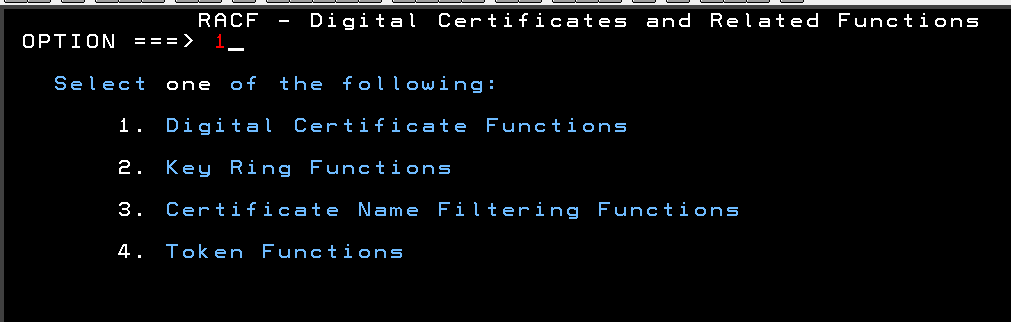
Select Digital Certificate Functions in RACF
Select Option 1 from the RACF Digital Certificates and Related Functions Menu
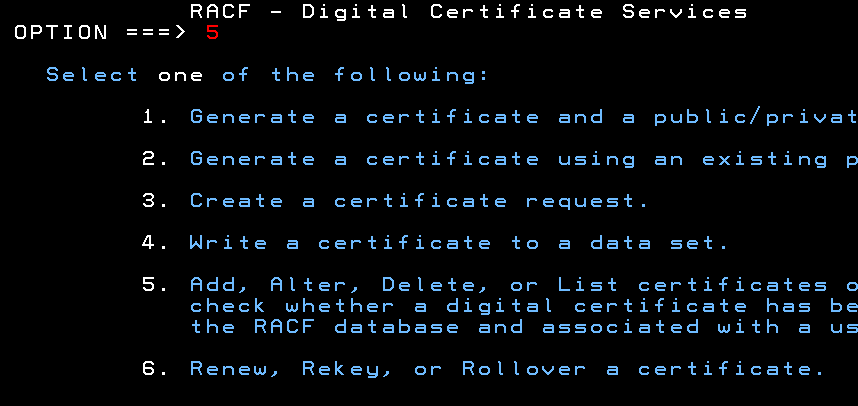
Select Add, Alter, Delete or List Certificates in RACF - Digital Certificate Services Menu
Select Option 5 from the RACF Digital Certificate Services Menu
Add Digital Certificate to RACF Database
Select Option 1 from the RACF Digital Certificate Services Main Panel
and place an S in the field for Certificate Authority.
.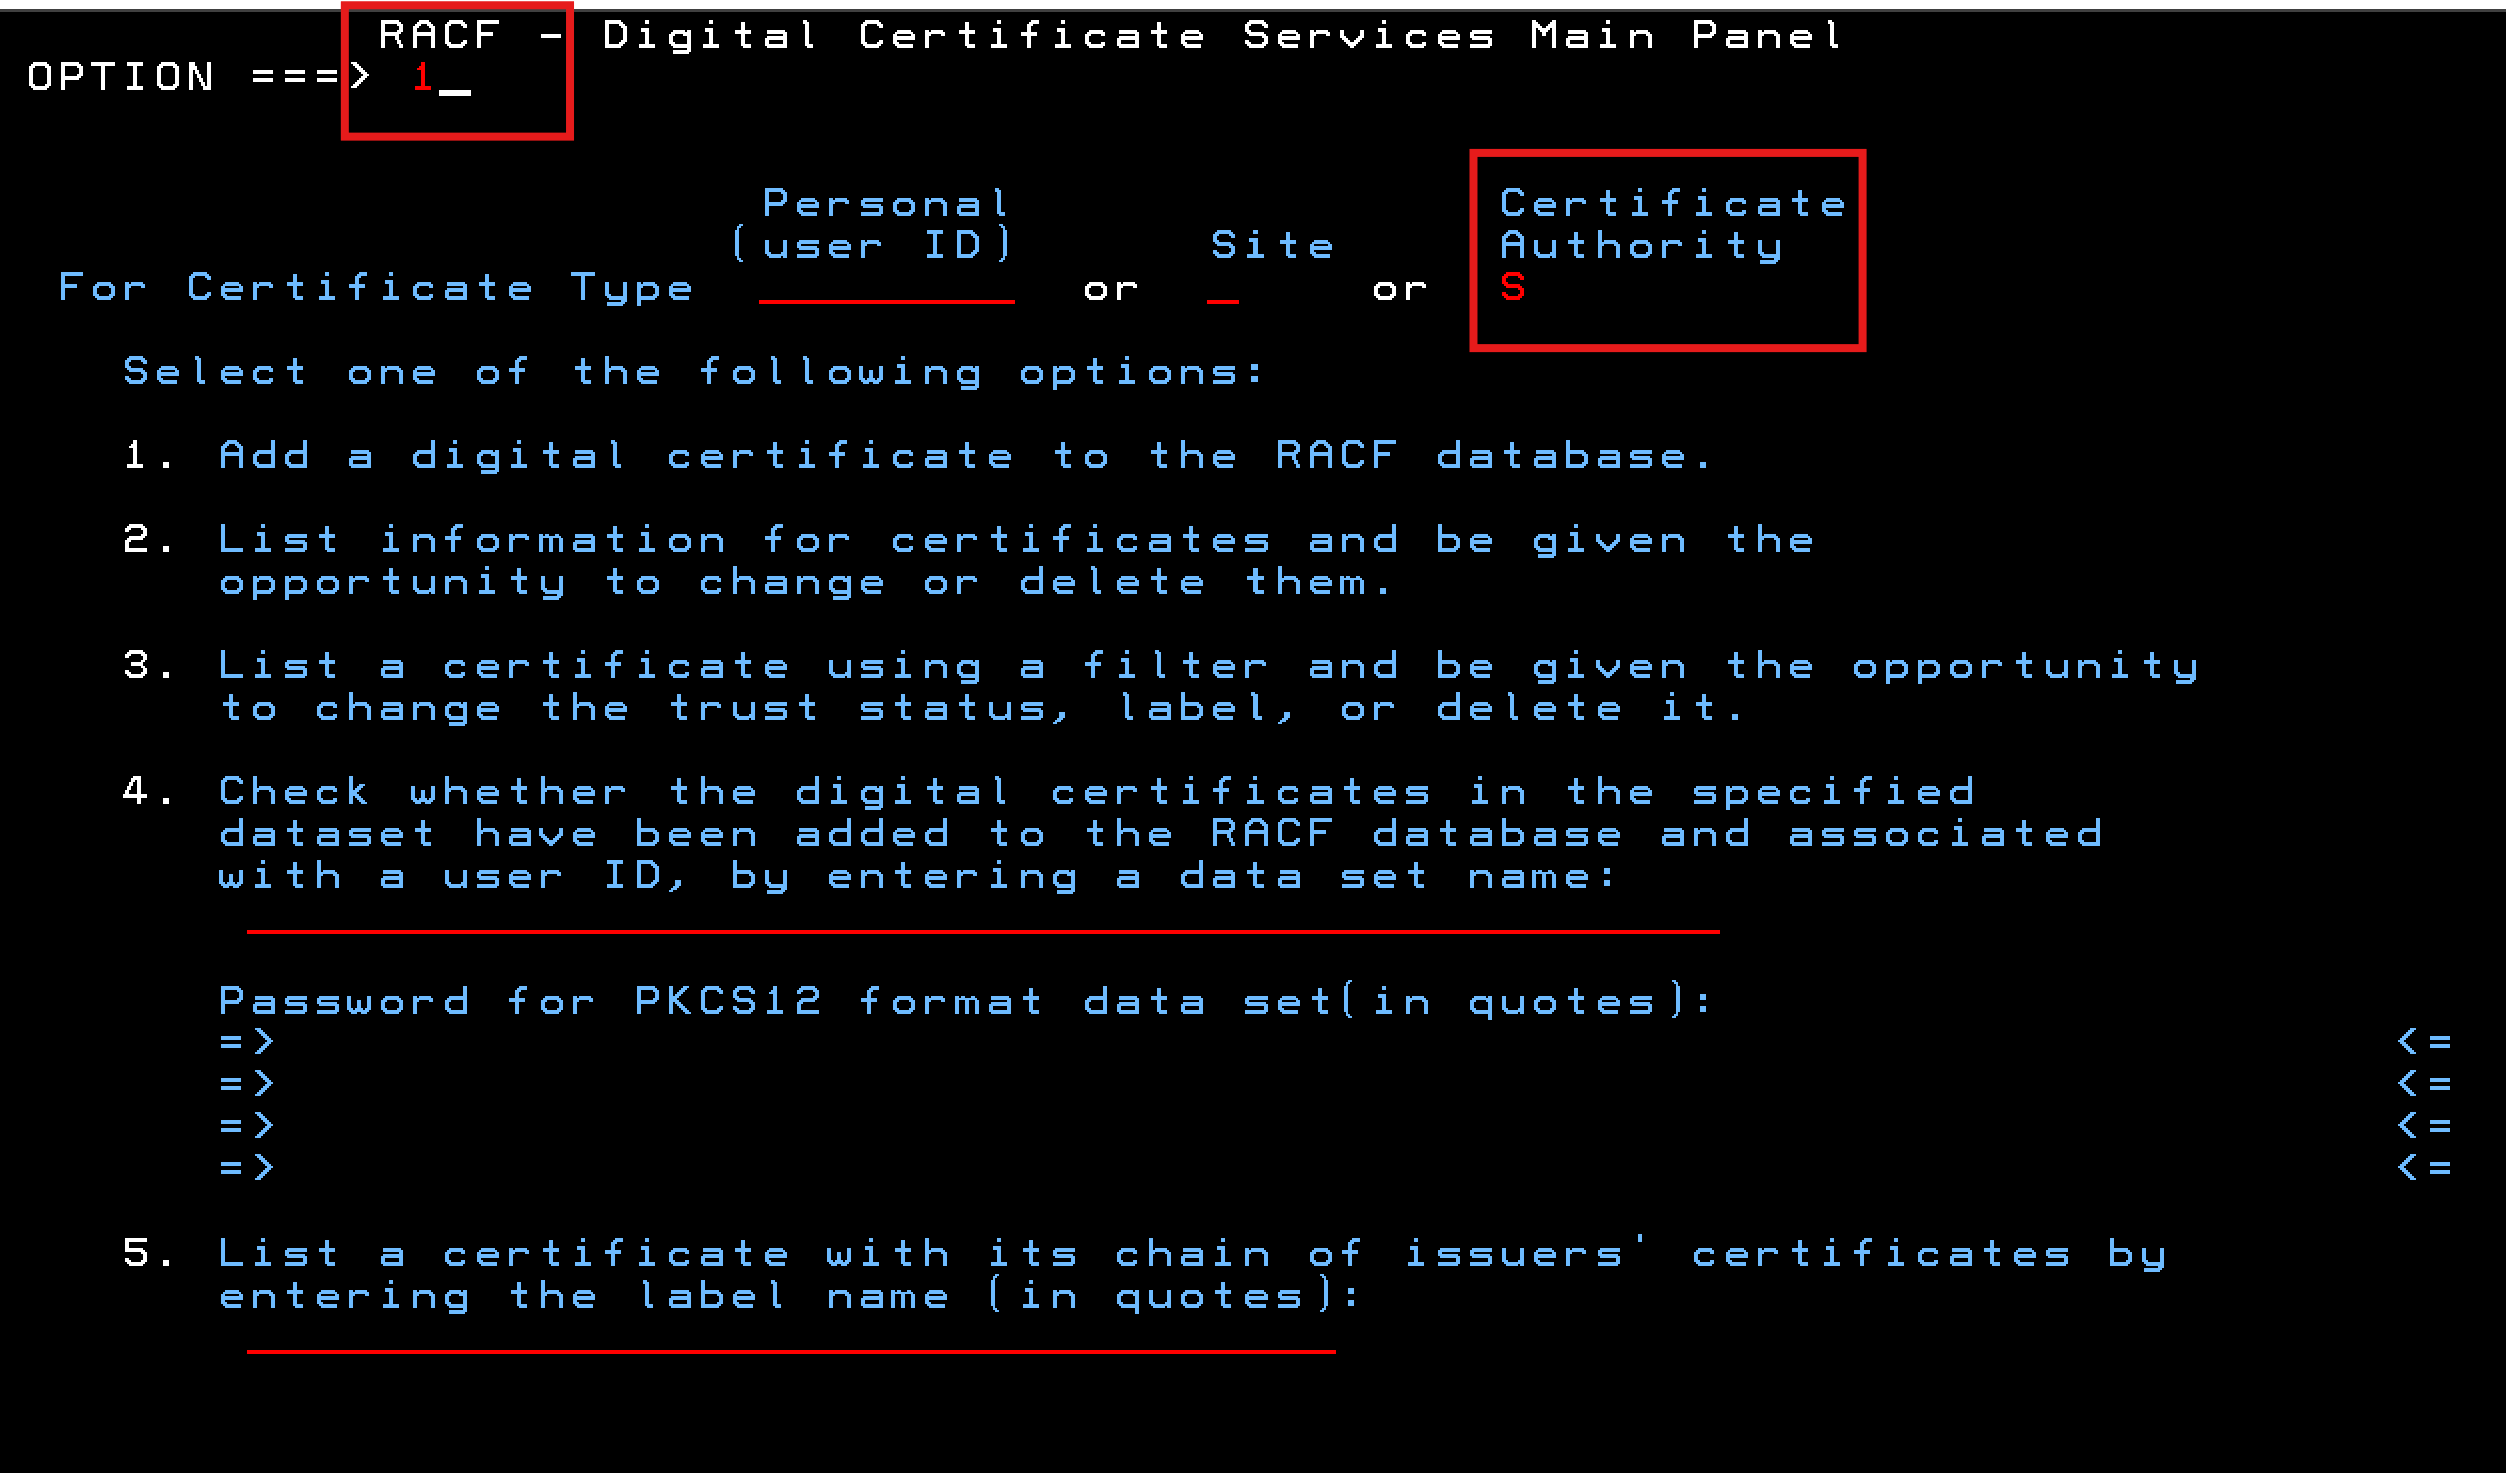
DO NOT import this certificate as a Personal Certificate
Provide the dataset name, certificate label, and trust to RACF
Dataset name: Provide the name of the sequential dataset that contains the Intermediate CA Certificate. You WROTE THIS DOWN in Step 3
Label name: Label this certificate. Once imported into RACF, the label is how you will indentify and work with the certificate in RACF
Trust: Select H - We want HIGHTRUST,
Save as software key: Place an S next to Save as a softwar key (default).
Private Key password:- Leave this blank. You don't have the private key password for this certificate.
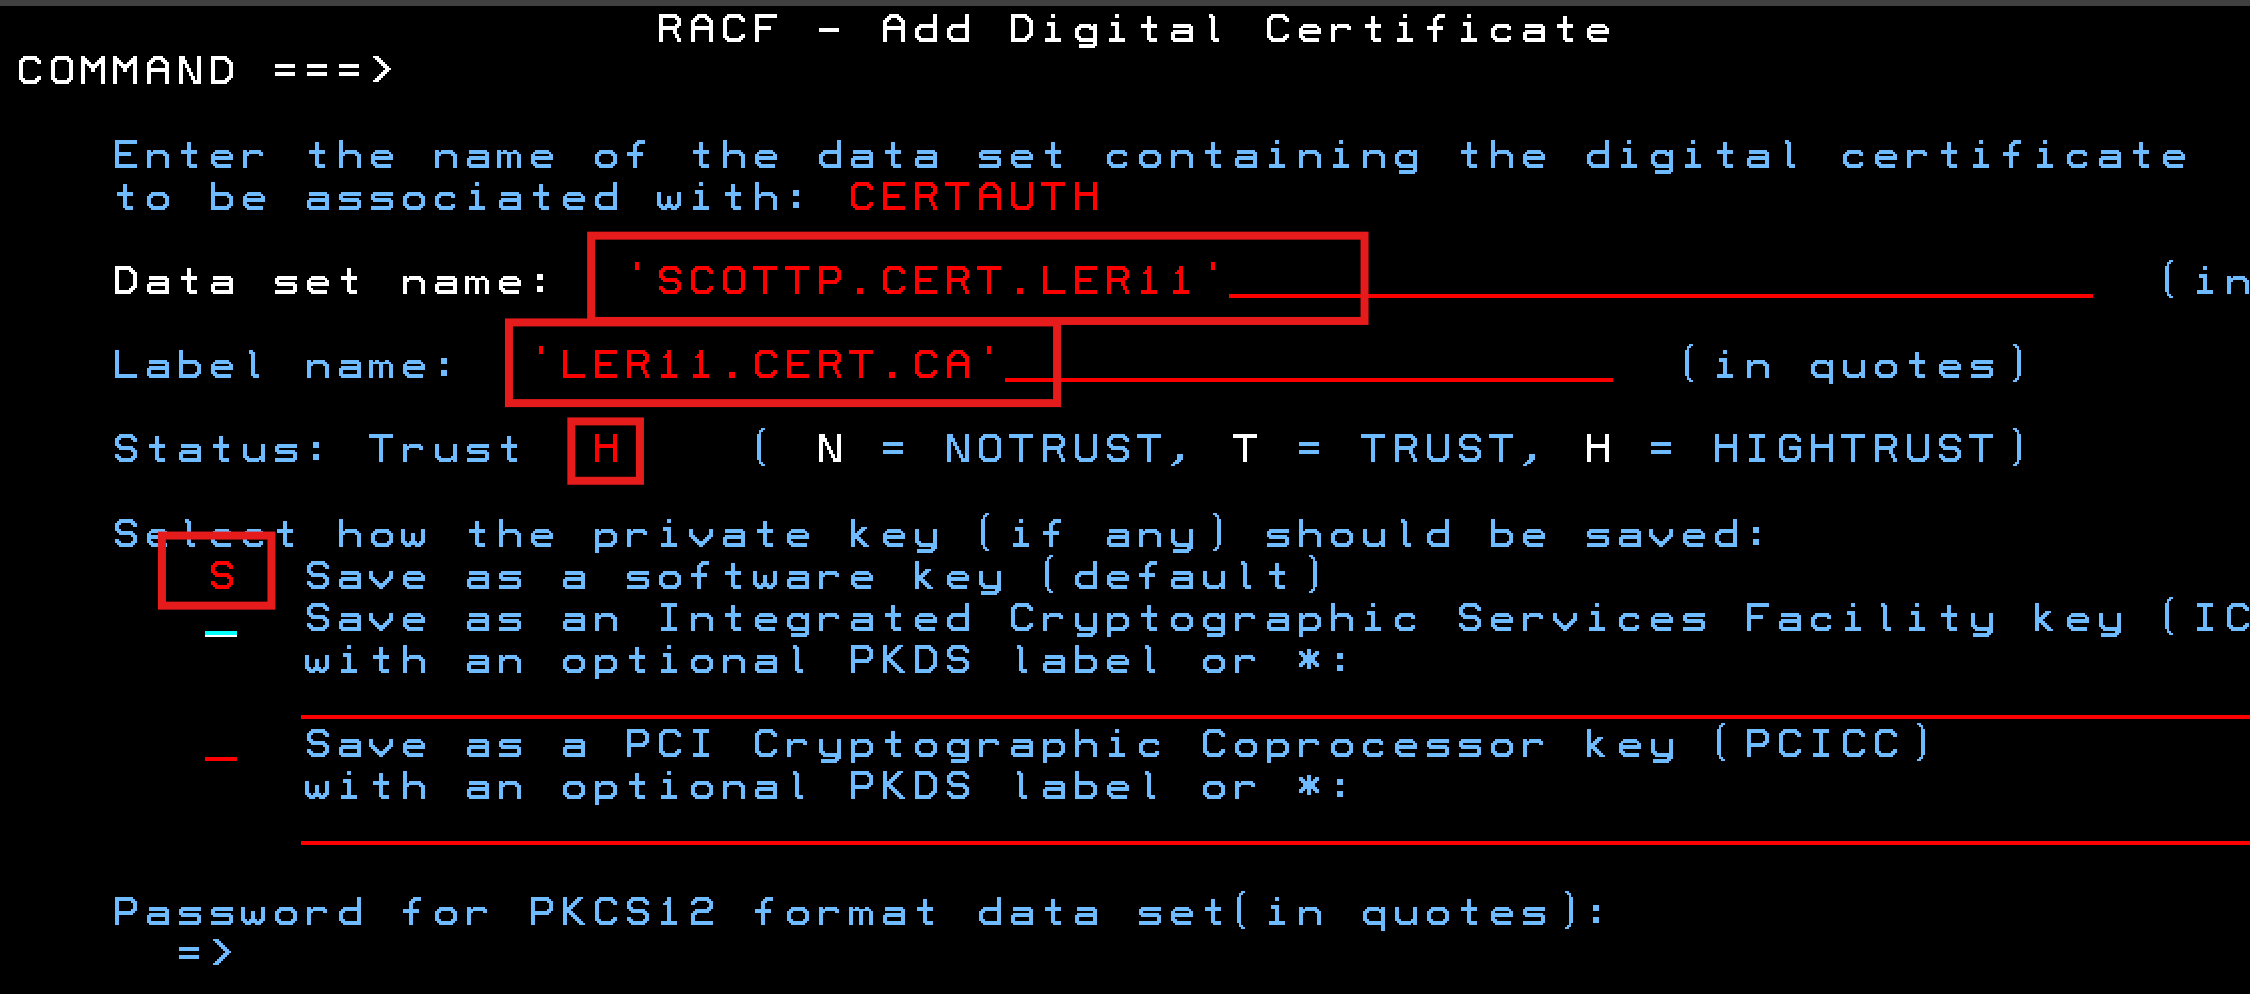
You can see I selected a label name of LER11.CERT.CA
WRITE THIS DOWN:
The label name of my Intermediate CA Certificate in RACF is __________________
After you press enter, you should receive a message indicating that the certificate was successfully imported.
Refresh RACF
We need to refresh the RACF database digital certificate information
Using TSO, issue the following command:
SETROPTS RACLIST(DIGTCERT) REFRESHAdd the Intermediate Certificate to our HTTPS KeyRing in RACF
We already have a RACF KeyRing that contains our SSL Certificate. We now need to att the Intermediate CA Certificate to that KeyRing so that the webserver can issue the complete certificate chain.
Open RACF
Select R from the ISPF primary option menu.
Select Digital Certificates, KEY RINGS and TOKENS Option (7) in RACF
Select Option 7 from the RACF SERVICES OPTION MENU
Select Key Ring Functions
Select Option 2 from the RACF Digital Certificates and Related Functions Menu

We want to connect the Intermediate CA Certificate to an Existing KeyRing
Select Option 4 from the RACF Digital Certificate Key Ring Servivces and provide the user name that your webserver runs as.
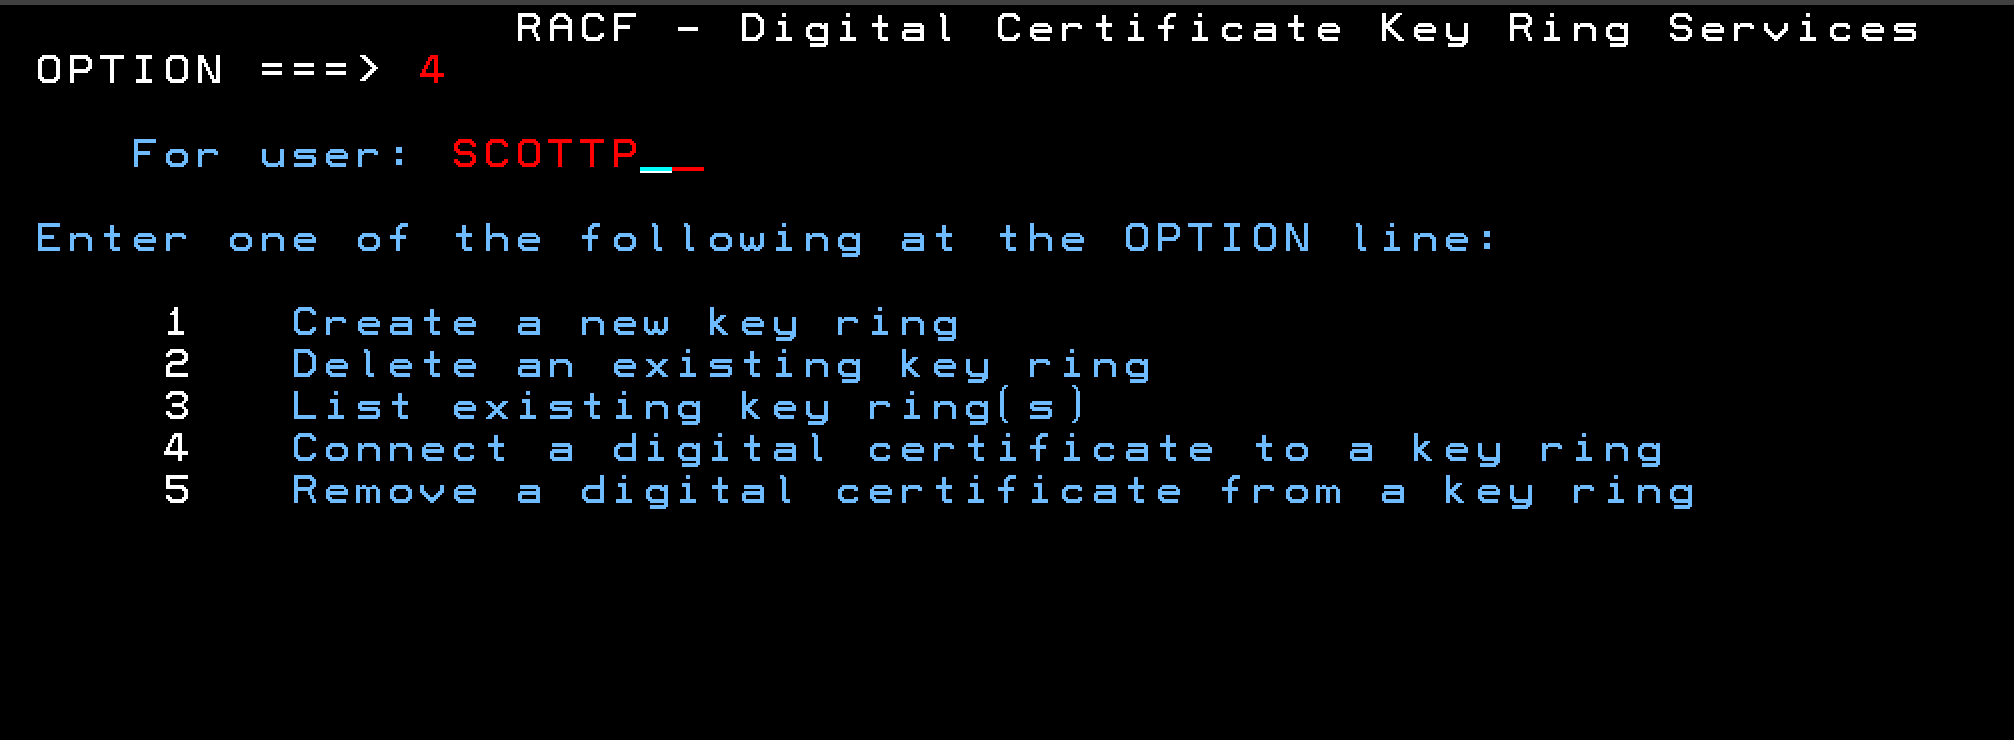
After you press enter, you will be prompted for the certificate details
Provide RACF with the Certificate to Add to a KeyRing
Provide the name of the KeyRing, the label of the intermediate CA Certificate, and the certificate options.
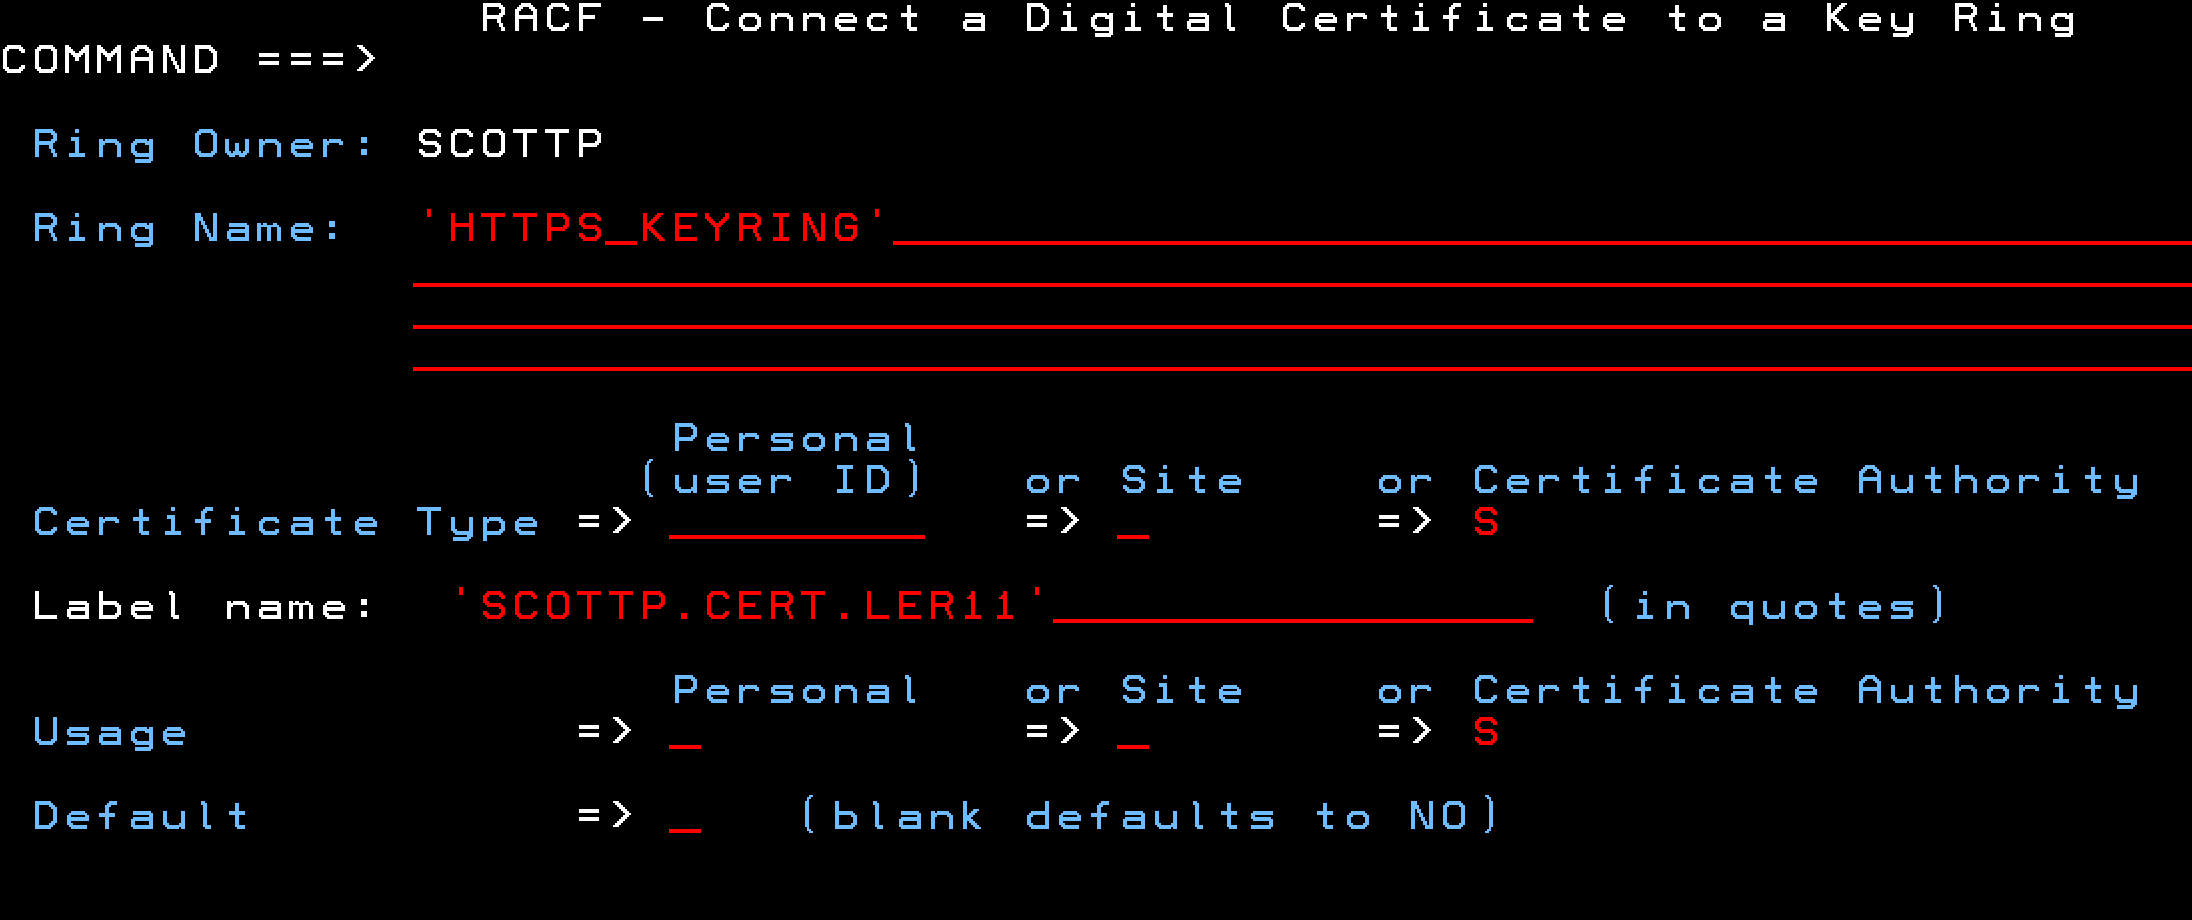
You can see I selected my existing key ring name of HTTPS_KEYRING.
Do not make this certificate the Default for the KeyRing (leave it blank).
Select Certificate Authoprity for the Certificate Type and Usage.
After you press enter you will be taken back to the RACF - Digital Certificates Key Ring Services
Refresh Keyring and Certificates in RACF
Using TSO, we need to refresh our RACF Key Rings and Certificates via:
SETROPTS RACLIST(DIGTCERT, DIGTRING) REFRESHUpdate Our WebServer's Configuration file
We need to edit our webserver's httpd.conf file to ensure the highest-security rules are enforced and only secure ciphers are supported
NOTE: Befor proceeding, you can restart your webserver to ensure that the complete certificate chain is now being served by your webserver. You can also test this using the SSL Labs Tester
Enable TLS 1.3
Let's enable TLS Version 1.3, Disable SSL Client Authorization, and Set the server's keyrefresh interval. Inside of your VirtualHost directive, add the following lines:
SSLProtocolEnable TLSv13
SSLClientAuth none
TLS13Options ServerKeyRefresh=604800Allow Strong Ciphers Only
After you have entered the lines from step 8.1 into your httpd.conf file, add these lines for secure cipher suites:
SSLCipherSpec TLS_ECDHE_RSA_WITH_AES_128_GCM_SHA256
SSLCipherSpec TLS_ECDHE_ECDSA_WITH_AES_256_GCM_SHA384
SSLCipherSpec TLS_ECDHE_RSA_WITH_AES_256_GCM_SHA384
SSLCipherSpec TLS_ECDHE_ECDSA_WITH_AES_128_GCM_SHA256
SSLCipherSpec TLS_AES_256_GCM_SHA384
SSLCipherSpec TLS_CHACHA20_POLY1305_SHA256
SSLCipherSpec TLS_AES_128_GCM_SHA256
NOTE:Comment out any other SSLCiperSpec entries by placing a # in the first column of cipher lines that do not match the ones listed. IE: We only want our webserver to support/allow these seven cipher suites
Enable HTTP Strict Transport Security (HSTS)
HSTS is a security policy mechanism which protects websites from man-in-the-middle, protocol downgrade, and cookie attacks by ensuring web clients only connect using a secure HTTPS connection.
After completing step 8.2, add the following line to your httpd.conf file, after the list of allowed ciphers:
Header always set Strict-Transport-Security "max-age=31536000; includeSubDomains; preload"
Test it out!
Kick your httpd server (restart it)
Your WebServer is now serving via a higher-security https.
Your pages should be served to your browser without errors, and your browser should show a lock or other icon in the URL field indicating that the your site is secure.
Higher-Security Review
You should test/review the security of your SSL Deployment.
You can test your website's SSL
Troubleshooting
If Apache is not starting correctly, check the status with the following command:
apachectl checkconfigTo view error logs, use:
tail -f logs/error.logIf you encounter errors, review the error_log and ssl_error log files.