Scott Piersall's Step-by-Step Guide For Using a Let's Encrypt Wildcard SSL Certificate on IBM HTTP Server Running on z/OS
My step-by-step guide to downloading, configuring, uploading and installing a wildcard SSL Certificate on z/OS from Let's Encrypt on IBM's HTTP Server running on z/OS.
Overview
Given the low-cost (free) and quick issue and renewal cycle for Certificate Authority's (CAs) which utilize the Automated Certificate Management Environment (ACME), there is increasing interest in utilizing SSL certificates signed by one of these CA's to secure websites hosted on IBM's HTTP Server Running in z/OS. I am writing this article based on My interest and (eventual) success in creating and installing a Let's Encrypt SSL Certificate on z/OS.
To help guide your efforts, I will prompt you to write a few things down as you proceed through these steps so that you have information from a step that is required for a subsequent step.
Prerequisites
What You Need
- A computer (I used a virtual machine) running Linux (I Used Ubuntu). You can also use a LinuxONE VM!
- RACF Permissions on z/OS to create datasets, install certificates, and create and modify keyrings.
- Knowledge of the USS command-line and ISPF panelsand server administration.
- Patience. I attempted this multiple times before I got it correct. I BELIEVE that I have eliminated most of the pitfalls and trap doors
Request a Signed Certificate from Let's Encrypt using CERTBOT
I created a small virtual machine on my local PC and installed a bare-bones installation of Ubuntu Linux. This step is required to install Let's Encrypts's certificate management utility called CERTBOT. The utility can be installed in a Python virtual environment in z/OS Unix, but I avoided that as I prefer to keep my z/OS Unix environment clean (read sterile).
Because I requested the certificate from a machine OTHER than the machine I plan to deploy the certificate on, I had to run CERTBOT with additional parameters:
certbot certonly --manual --preferred-challenges=dns -d "*.scottsdomain.com"This command, with the options specified, will not attempt to install or make any modificaations to the local computer.
certonly parameter instructs CERTBOT that I just want the certificates.
--manual means that I want to manually validate that I have domain ownership and control. IF YOU DO NOT SPECIFY MANUAL, CERTBOT WILL START A WEBSERVER and attempt validation through the webservice.
--preferred-challenges=dns instructs Let's Encrypt that I want to verify ownership and controll of scottsdomain.com using a DNS challenge. When you run this command, CERTBOT will instruct you to create a TXT entry in your DNS system.
-d "*.scottsdomain.com" specifies that I am requesting a wildcard "*" certificate for scottsdomain.com. This means that you can use this certificate on any webserver that has a URL ending in scottsdomain.com
You will be prompted for organization names, etc. Answer those how you choose. This information will appear on your certificate
More information on installing and configuring certbot can be found here
Put your certificate files together in a format that will make RACF happy
We need to put the certificate files into a format with options that will make RACF happy.
CERTBOT created a folder in /etc/letsencrypt/live/scottsdomain.com . Change directory to this location (use your domain name. scottsdomain is for illustrative purposes) and let's "massage" the files into a format suitable for RACF consumption
cd /etc/letsencrypt/live/scottsdomain.comThe folder will have five files: (verify this by typing ls)
	  cert.pem
	  chain.pem
	  fullchain.pem
	  privkey.pem
	  README
We only care about two of these files: fullchain.pem and privkey.pem
We need to combine the fullchain.pem (this contains our certificate, and the CA's certificate chain) and our private key
We will export the fullchain and private key into a single PKCS12 format file. I did this using openssl via the following command:
openssl pkcs12 -export -out scotts.cert.p12 -in fullchain.pem -inkey privkey.pemREAD THIS! READ THIS! READ THIS! READ THIS! THE FIRST (OF SEVERAL) TRAP DOORS I FELL THROUGH. After you type the command above, openssl prompts you to set an export password for the private key. In the interest of keeping things simple, I just pressed return the first few time(s) (IE: I did not password protect the private key), yes it took me some failed attempts to realize this was wrong. RACF will NOT import the private key if it is not protected with an export password.
ANOTHER SUGGESTION, DO NOT USE THE ' CHARACTER IN THE PASSWORD
YOU MUST SET AN EXPORT PASSWORD FOR THE PRIVATE KEY WHEN YOU EXPORT IT. RACF WILL NOT IMPORT A PRIVATE KEY WITH NO EXPORT PASSWORD SET
WRITE THIS DOWN:
The export password for my private key is: _______________________
You will need to provide RACF with this password to import the certificate and private key in the next steps
base64 encode the cert.p12 file you created in step 2
A supported import format for RACF is base64 encoded PKCS12 certificate. So, we need to base64 encode the file we created in step 2
base64 -i scotts.certp12 > scotts.cert.p12.64We then need to add the -----BEGIN CERTIFICATE----- and -----END CERTIFICATE----- as the first and last lines in the base64-encoded file we just created. I used sed, you are free to use a text editor (vi) or any other means to accomplish this.
sed -i -e '1i\'"-----BEGIN CERTIFICATE-----" -e '$ a\'"-----END CERTIFICATE-----" scotts.cert.p12.64Create a Sequential Dataset in z/OS
We need to create a sequential dataset to store the certificate we just created. We will need to provide the dataset name to RACF to import this certificate into the RACF database.
I have included the dataset parameters I used (you don't need 5 cylinders, 1 is plenty).
NOTE: You must use a RECFM=VB and a LRECL=256. If you use a different RECFM or LRECL size, RACF will not import the certificate from the dataset and give you an invalid data error.
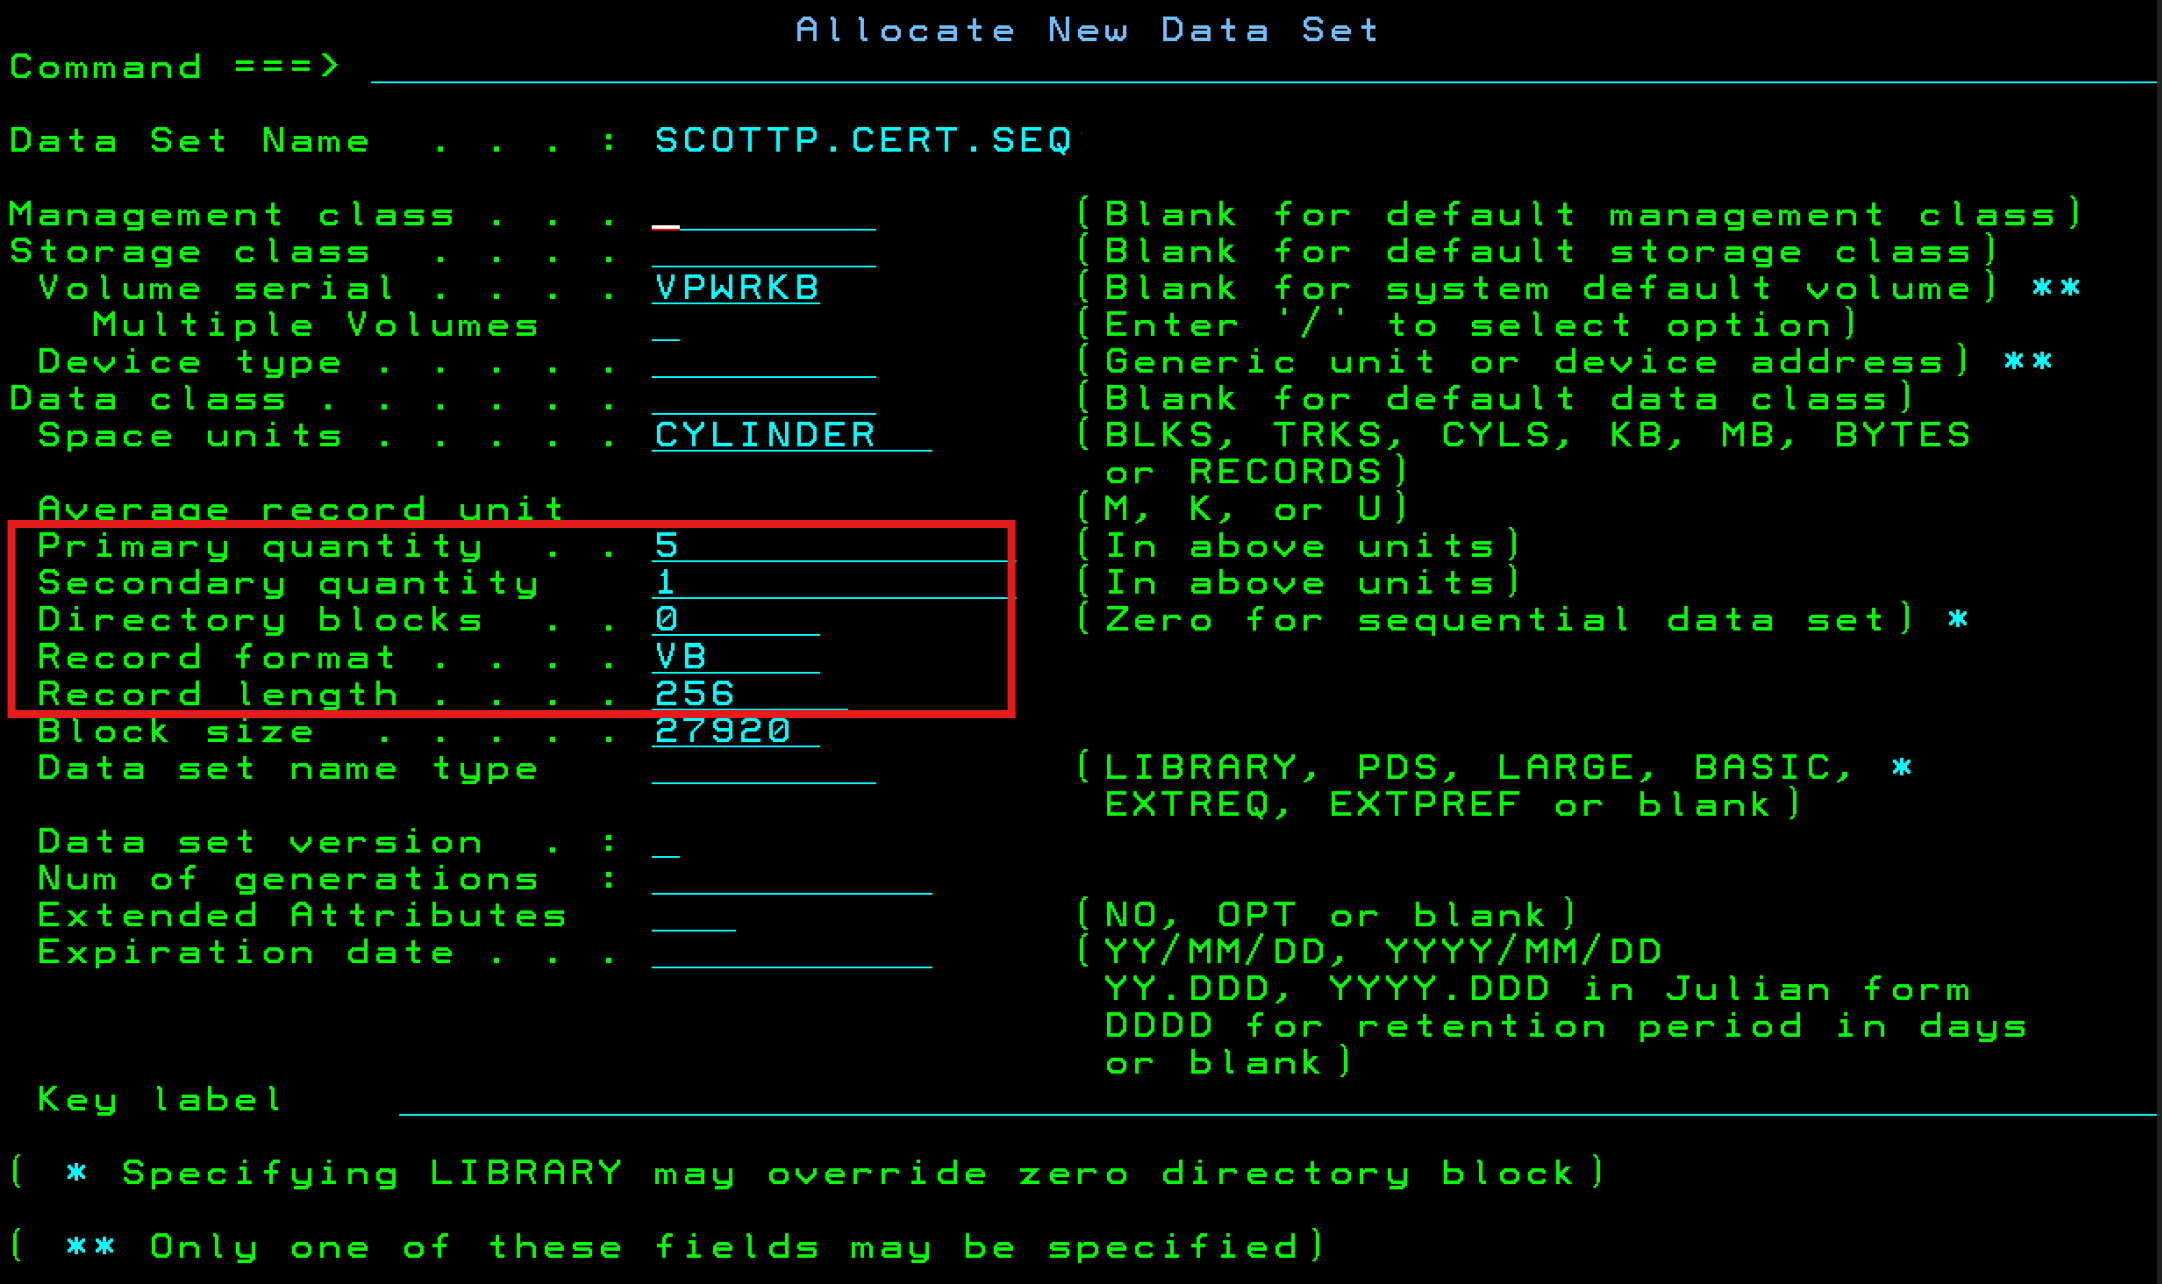
NOTE: I called my dataset SCOTTP.CERT.SEQ so that I could remember that it contains a cert and is a sequential dataset. You should only need 1 cylinder. If space is a concern for you, after you import the certificate into the RACF database, you can delete this dataset.
WRITE THIS DOWN:
The certificate dataset name is: _______________________
You will need to provide RACF the dataset name when you add the certificate to RACF
Upload base64 certificate Created in Step 3 into our Sequential Dataset
We now need to upload the contents of the base64 certificate we created in step 3 into the sequential dataset we created in step 4. I did this by FTPing scotts.cert.p12.64 to my z/OS Unix (Unix System Services) home directory and then using cp command in Unix to copy the contents to the dataset .
cp scotts.cert.p12.64 "//'SCOTTP.CERT.SEQ'"Import Certificate into RACF Database
Using RACF, we need to import the certificate contained in our dataset into the RACF database. You can of course do this using TSO/commandline. I will walk you through the steps (6.1 - 6.7) using ISPF
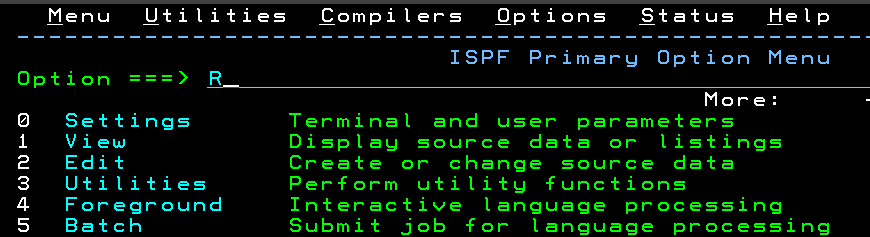
Select RACF from the ISPF Primary Option Menu
Select "R" from the ISPF Primary Option menu
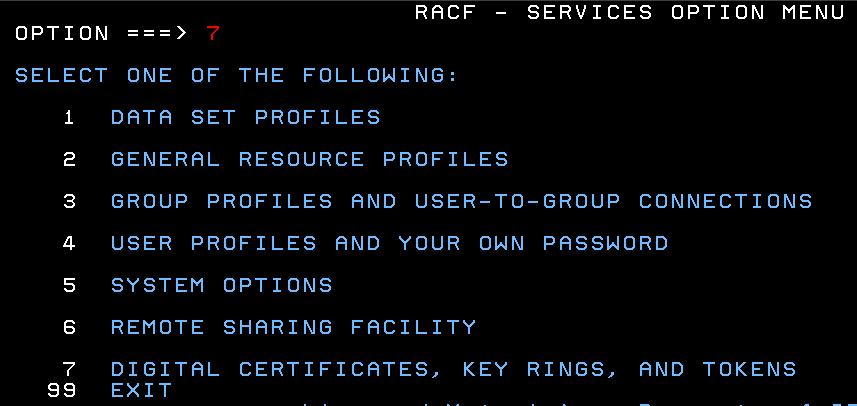
Select Digital Certificates Option in RACF
Select Option 7 from the RACF SERVICES OPTION MENU
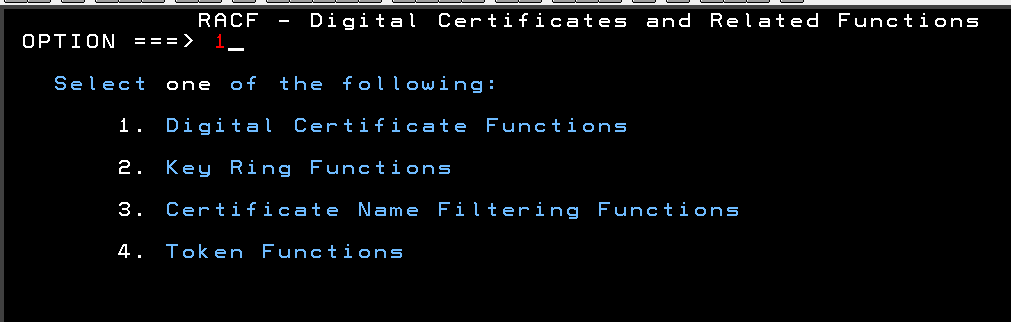
Select Digital Certificate Functions in RACF
Select Option 1 from the RACF Digital Certificates and Related Functions Menu
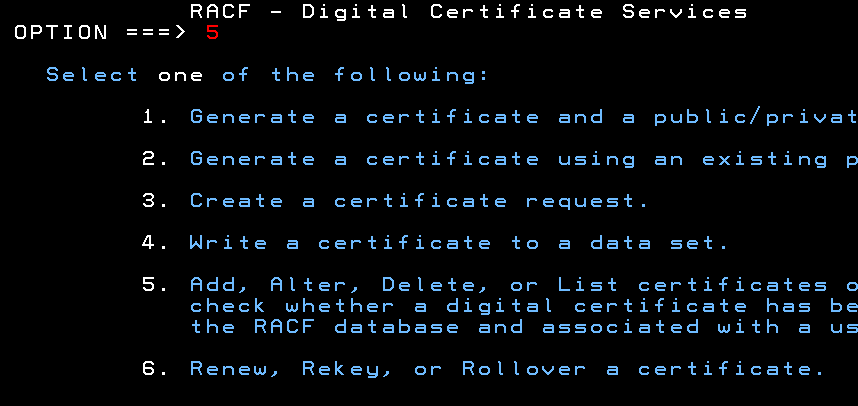
Select Add, Alter, Delete or List Certificates in RACF - Digital Certificate Services Menu
Select Option 5 from the RACF Digital Service Menu
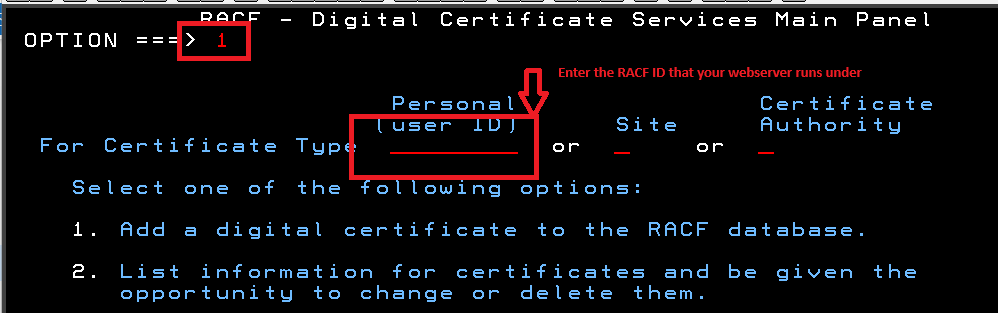
Add Digital Certificate to RACF Database
Select Option 1 from the RACF Digital Service Menu
You also need to select Personal(user ID) and fill that field with the RACF userid that your webserver runs as. This will allow the webserver to access the certificate and keyrings that contains the certificate.
Provide the dataset name label, trust, and key to RACF
Dataset name: Provide the name of the sequential dataset that contains the certificate. You WROTE THIS DOWN in Step 4
Label name: Label this certificate. Once imported into RACF, the label is how you will indentify and work with the certificate in RACF
Trust: Select H - We want HIGHTRUST,
Save as software key: Place an S next to Save as a softwar key (default).
Provide the password private key. You WROTE THIS DOWN in Step 2. The password MUST be enclosed in quotes, and the password will not be shown when you type it.
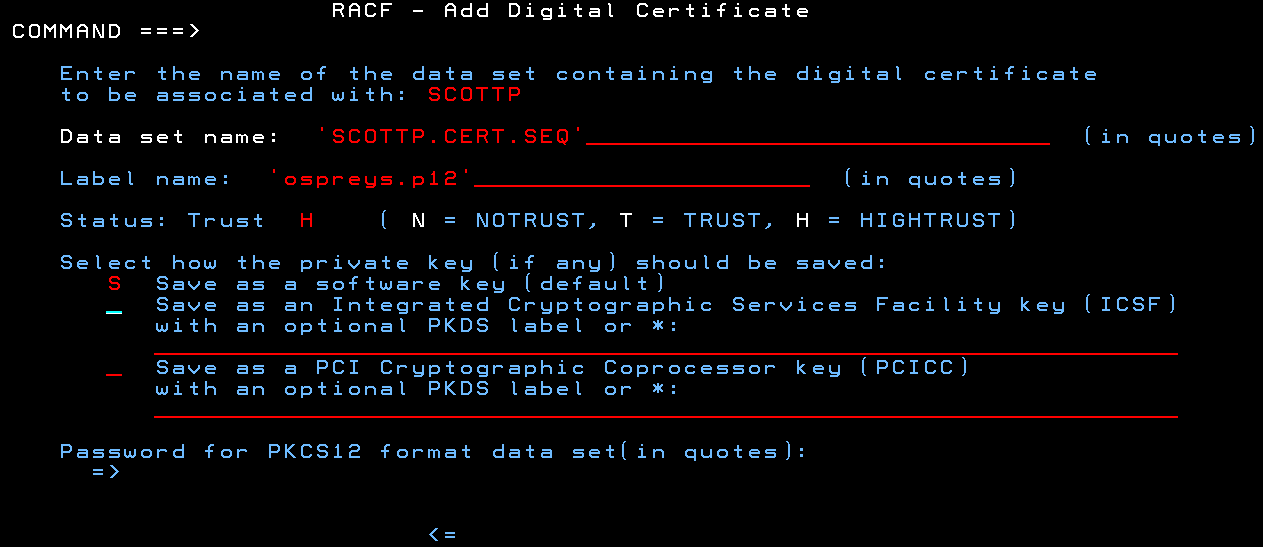
You can see I selected a label name of ospreys.p12
WRITE THIS DOWN:
The label name of my certificate in RACF is __________________
After you press enter, you should receive a message similar to this:

Refresh RACF
We need to refresh the RACF database digital certificate information
Using TSO, issue the following command:
SETROPTS RACLIST(DIGTCERT) REFRESHCreate a keyring and add our imported certificate to it
Why a keyring? RACF is exceptionally good at enforcing the least privilege tenet of security. Importing the certificate into RACF, and placing it on a keyring places another layer into our defensive depth strategy for protecting our certificates and ensures they are accessible only where absolutely needed. With the certificate imported, we create a keyring to give this "key" only to security principals which actually need it. This approach is a SIGNIFICANT improvement over Apache on Linux where certificates are stored in flat files on the filesystem(Potentially exposing them to improper disclosure).
Still not convinced? Ok, here is my analogy:At our company, we have a locked closet that contains a key to every room in a building owned by our organization (this locked closet is our RACF database). "Mary" has an office on the third floor. We create a keyring for Mary and place two keys on the keyring: a key to open the front door of the building, and a key to her office. By using this keyring, we give Mary only the keys she needs - she can get in and out of the front door and in to her office. "Bill" is our custodian who cleans the building offices and collects trash in all of the rooms. Bill's keyring has keys to all of the offices, plus the front and back doors to the building, plus a key that gives him access to areas where trash is collected and custodial supplies are kept. Only highly-trusted people in the organization have a key to the closet where they keys are stored (these are our RACF administrators).
Create the keyring in RACF
Select R from the ISPF primary option menu.
Select Digital Certificates, KEY RINGS and TOKENS Option (7) in RACF
Select Option 7 from the RACF SERVICES OPTION MENU
Select Key Ring Functions
Select Option 2 from the RACF Digital Certificates and Related Functions Menu

Create a new key ring
Select Option 1 from the RACF Digital Certificate Key Ring Servivces and provide the user name that your webserver runs as.

Name Your Key Ring
Provide a name for your key ring
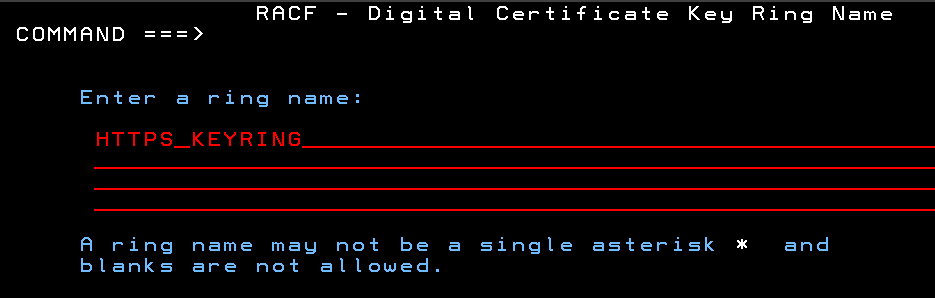
You can see I selected a key ring name of HTTPS_KEYRING. This naming convention reminds me what I am using each keyring for.
WRITE THIS DOWN:
The name of my Key Ring is __________________
After you press enter you will be taken back to the RACF - Digital Certificates Key Ring Services
Add Your Certificate to Your Key Ring
We are now going to add our certificate in RACF to the key ring we just created in step 7.4.
Select option 4 - "Connect a digital certificate to a key ring"
The screenshot below shows the fields and values with my examples. I have also noted which values (that I asked you to write down) go into which fields).

After you press enter you will be taken back to the RACF - Digital Certificates Key Ring Services
Refresh Keyring and Certificates in RACF
Using TSO, we need to refresh our RACF Key Rings and Certificates via:
SETROPTS RACLIST(DIGTCERT, DIGTRING) REFRESHConfigure SSL using MOD_IBM_SSL and our RACF Keyring
We need to edit our webserver's httpd.conf file to enable the IBM SSL Module and to configure a virtual host for SSL. These edits include enabling the IBM SSL Module, and configuring a virtual host for port 443
Enable the MOD_IBM_SSL Module
Uncomment the following line in your httpd.conf so it looks like this:
LoadModule ibm_ssl_module modules/mod_ibm_ssl.soEnable and edit virtual host for port 443 (https default)
Create a Virtual Host configuration in your httpd.conf file. The virtual host configuration will include the TCP port number to Listen on, the ServerName, and KeyFile to use.
My httpd.conf file has this virtual host entry:
Listen 443
<VirtualHost *:443>
          ServerName www.scottsdomain.com
          SSLEnable
          SSLTrace
          KeyFile /saf SCOTTP/HTTPS_KEYRING
</VirtualHost>
SSLCacheErrorLog logs/ssl_error.log
Notice the KeyFile line? Configure that line with the userid followed by a / and then the name of the RACF Keyring which contains the certificate.
Also, I turned on SSL logging to help me identify issues (it's how I identified my initial key issue). Once you have everything working, you may want to turn the SSL logging off, especially in a high load / busy website that contains the certificate.
Test it out!
Kick your httpd server (restart it)
Your httpd server should now be serving via https.
You can test this by openening a web browser to your site. In my example, this could be: https://www.scottsdomain.com
Your pages should be served to your browser without errors, and your browser should show a lock or other icon in the URL fields indicating that the site is secure.
Higher-Security Configuration
Should you want to increase the security of your deployment, there are additional steps that you can take to enable TLS 1.3 and allow only secure cipher suites. You can also add Lets Encrypt's intermediate certificate to your RACF KeyChain so that your webserver provides the complete certificate chain so that the remote client/browser does not need to download it separately.
You can review the results of my High-Security Configuration for This Website.
You can test your website's SSL
Want to improve the security / "score" for your website? Check out my guide for securing your SSL Deployment on IBM HTTP Server on z/OS
Troubleshooting
If Apache is not starting correctly, check the status with the following command:
apachectl checkconfigTo view error logs, use:
tail -f logs/error.logIf you encounter errors, review the error_log and ssl_error log files.
If the pages work but you get certificate warnings, or a warning on the web browser, we can do more to increase the security of our deployment. If you want to ramp up the security of your deployment, move on to my next article on High Security
Acknowledgements
Many people offered help, support an encouraagement:
Thank you to the ENTIRE System Z Enthusiasts Discord!
Thank you Steven Perva for working with me on multiple attempts to get this working
Thank you Paul Newton at IBM for providing a z/OS platform for my university students. We are making mainframers!
Could this be automated? - Yes .. I am working on that.
Should this be automated? - Maybe .. Certificates provide trust to the user that you are who you say you are. I prefer to have some manual steps in this process so that the certificates can be reviewed before installation into RACF and deployment.
Will this be automated? - Yes .. I am working on simplifying these steps .
Why did you do this? - I like a challenge and I am happy to publish this howto to a community of IBMers who continute to be incredibly supportive and encouraging
References
I read a lot of how-to articles, book chaapters, etc
I have created links to these sources, including a page I created with helpful links
| My Curated List of Mainframe Resources |
| Colin Paice's Getting HTTPD Server to Work with TLS on z/OS |
| IBM's IBM HTTP Server Certificate Management |